


Slow Rotary Cuts
20/08/16 21:51
I found that the rotary axis turned really slow during jobs. I solved this problem by writing a program called "Rapid Rotary". For details see this page: https://www.ganotechnologies.com/cnc/rapidrotary/
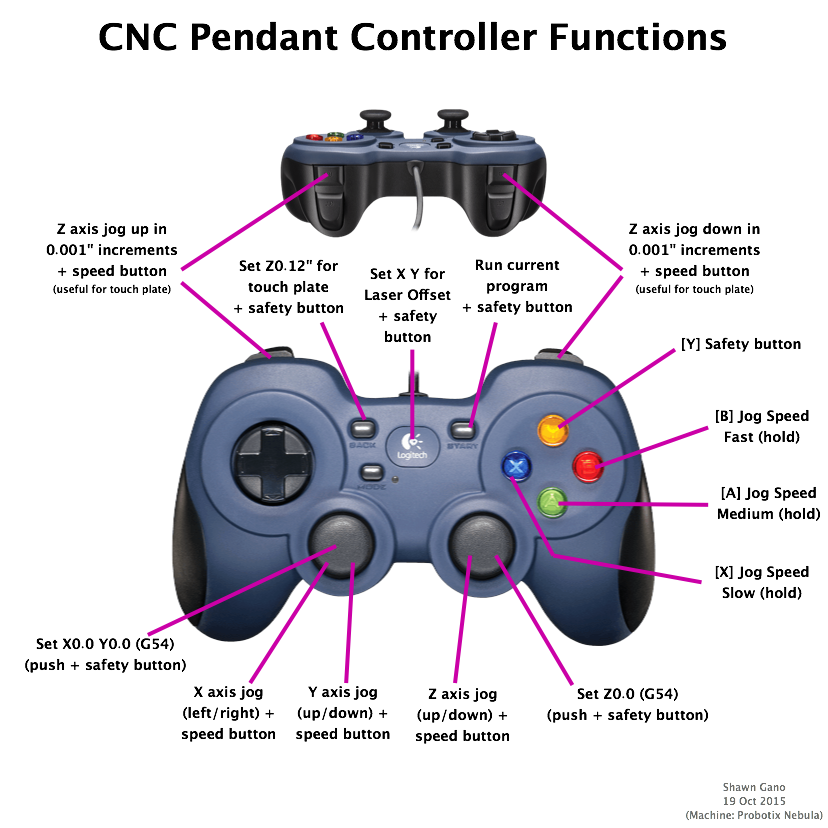
Customized XBox Controlller Pendant
21/10/15 22:46
Explain features and link copies of the config files and custom G and M code files.
Setup LinuxCNC Simulator in a Virtual Machine
14/10/15 14:39
Running LinuxCNC in a virtual machine can be useful for debugging or experimenting with user interface modifications and also simulating GCode programs. These are my notes on getting LinuxCNC (simulator) running on my Macbook Pro using Parallels:
Notes:
--------------------
Steps to get LinuxCNC to work:
- turn off 3D accceleration
- increase graphics memory to 128MB
(After install turn off all network connections!!! this is an insecure and vulnerable VM)
-----------------
Install the base Linux Ubuntu 10.04 install: (32-bit version)
-- During VM setup/install turn off 3D acceleration --- never turn it on -- if it is ever turned on the sim will stop working permanently.
(32-bit machine)
wget http://www.linuxcnc.org/lucid/dists/lucid/linuxcnc2.5-sim/binary-i386/linuxcnc-sim_2.5.1_i386.deb
sudo dpkg -i linuxcnc-sim*.deb
the last line will give errors, so run:
sudo apt-get -f install
then redo:
sudo dpkg -i linuxcnc-sim*.deb
and finally:
sudo apt-get -f install
then run emc (and choose a sim config)
./emc
http://wiki.linuxcnc.org/cgi-bin/wiki.pl?LinuxCNC_Pure_Simulator
DIY Clamps that work great!
09/10/15 14:56
coming soon... a design that I think works really well for clamping projects
Adding T-tracks to the CNC Router Table
01/09/15 23:40
There are many options to holding down material including: screwing the work piece directly into the surface, threaded inserts in a grid, T-tracks, and vacuum table. T-tracks seems to be the most versatile to me and so that is what I installed on my machine (threaded inserts were also tempting). I decided to space them out on 4" centers and I had to work around some removable sections on my machine bed (for the rotary axis and the end joinery areas). If you decide to use T-tracks be sure to remember to leave some open space on the ends to insert the bolts into the tracks. I used 1/4" Mini T-Track from Eagle America.
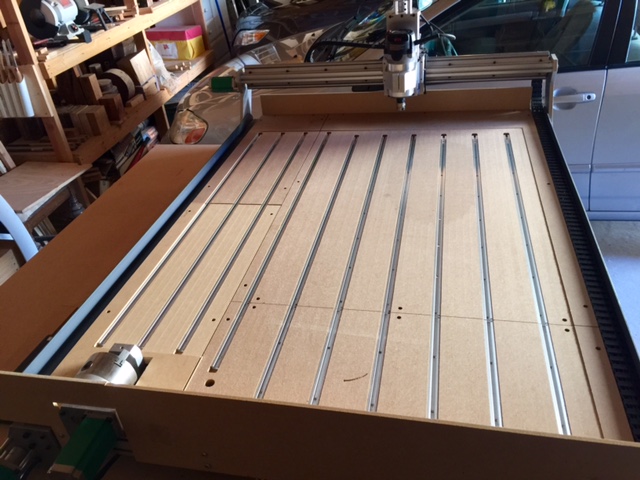
Flatten the Top of the Table
31/08/15 23:39
When starting out be sure to mill the top of your CNC machine so that it is perfectly flat. This makes z-measurements more accurate across the table for larger pieces. It also produces a small lip around edge which is useful for using spacer blocks to setup/align material to be clamped so that it is perfectly alined with the x or y axis (it also helps visualize the working space available). Another thing you may want to do is v-carve a grid across the workspace to help with aligning material.
Getting Started with the CNC Rotary Axis
26/08/15 16:17
I am just starting to learn about how to use the rotary axis on the Probotix Nebula. Here are a couple of resources that I have found to be very useful so far.
1) Tutorials for creating a rotary based project in Aspire:
- Rotary Machining 2D/2.5D
- Rotary Machining 3D
- Import and Unwrap Rotary 3D Model
2) A LinuxCNC post processor for Aspire (or VCarve-Pro). (Installation Instructions: here and here )
3) A great YouTube video by Stuart Covey
1) Tutorials for creating a rotary based project in Aspire:
- Rotary Machining 2D/2.5D
- Rotary Machining 3D
- Import and Unwrap Rotary 3D Model
2) A LinuxCNC post processor for Aspire (or VCarve-Pro). (Installation Instructions: here and here )
3) A great YouTube video by Stuart Covey
Simple Touch Off Plate For the CNC Router
24/08/15 23:00
This is a simple project but one you will find very handy to have when working with a CNC router. This touch off plate uses a simple circuit with an LED light to tell you when the router bit is touching the plate that is placed on the work piece. Then you can set the proper Z-value for that bit. This makes changing bits easy and repeatable!
Video of the project: https://youtu.be/MpVBYfTKSDU
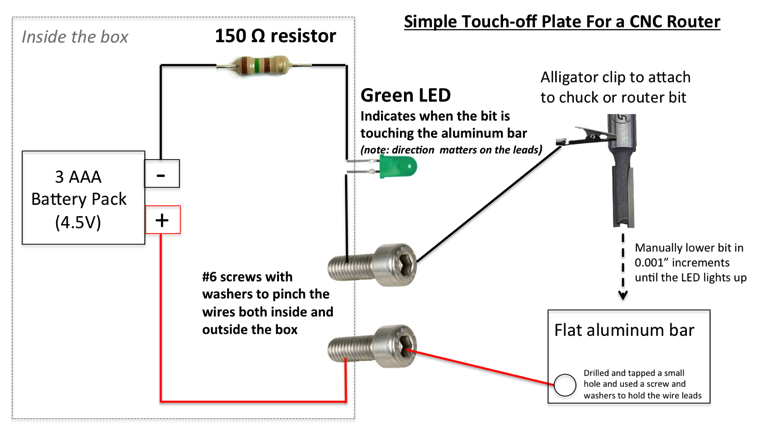
Demonstrated using my Probotix Nebula.
Adding a Cycle Timer to the LinuxCNC / AXIS Interface
14/08/15 11:08
After making a few parts I was interested in seeing how close the estimated toolpath times that Aspire predicted matched the actual machining time. Unfortunately I couldn't find anything in the AXIS interface for LinuxCNC that would time the running of a program. So I e-mailed Len from Probotix and he pointed me to some helpful documentation that started me on the path to creating the timer you can see in the upper right corner of this screenshot (it is labeled Cycle Time -- but I have since changed it to just Time to save some screen area).
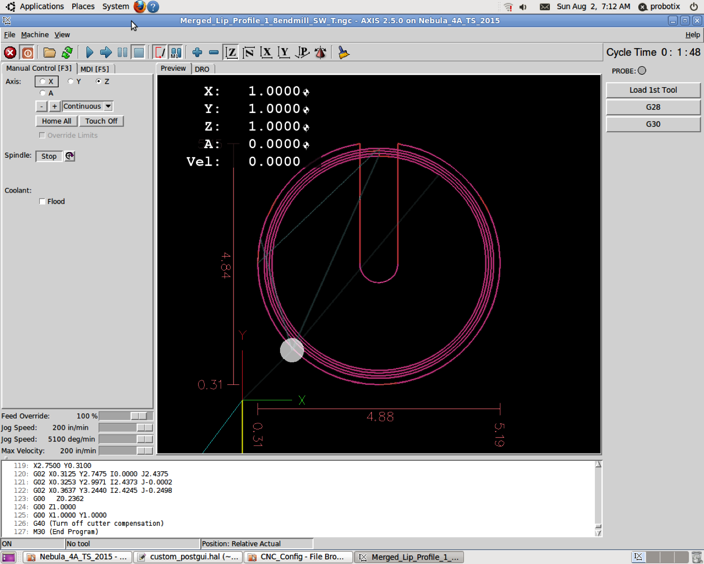
This timer works very well and it resets each time a new program is run (or paused) and also automatically stops when the program finishes.
Below are the steps I used to add the timer. One thing to note is that I have the tool sensor on my machine so that custom panel on the far right (with Probe, Load 1st Tool, etc.) was already part of my config. If you don't have the tool sensor you can use the tool sensor setup for your machine (it should work fine - as I had mine unplugged on accident for a while) or just compare them to the config files you are using to see how to add the custom bar. To find the different configuration files look in the probotix/linuxcnc/configs directory. Then look for the TS code in the naming convention for your machine --- for example I am using Nebula_4A_TS_2015.
In the custompanel.xml file (for me this was the file probotix/linuxcnc/configs/custompanel.xml) add these lines right after the first 3 lines (just after
Then edit the custom_postgui.hal file (which should be the same directory) and add these lines to the very end of the file:
# SEG 1 August 2015 -- hooking up cycle timer
loadrt time
#loadrt not
addf time.0 servo-thread
addf not.5 servo-thread
net prog-running not.5.in <= halui.program.is-idle
net cycle-timer time.0.start <= not.5.out
net cycle-seconds pyvcp.time-seconds <= time.0.seconds
net cycle-minutes pyvcp.time-minutes <= time.0.minutes
net cycle-hours pyvcp.time-hours <= time.0.hours
After those changes run the .ini file in that same directory which should start up LinuxCNC/Axis with the timer in the upper right corner!
Here are the final files with all of the changes given above: Nebula_4A_TS_2015.zip
References:
http://www.linuxcnc.org/docs/devel/html/man/man9/time.9.html
http://wiki.linuxcnc.org/cgi-bin/wiki.pl?SimpleCycleTimer
http://linuxcnc.org/docs/html/hal/components.html
http://linuxcnc.org/docs/html/hal/pyvcp_examples.html
This timer works very well and it resets each time a new program is run (or paused) and also automatically stops when the program finishes.
Below are the steps I used to add the timer. One thing to note is that I have the tool sensor on my machine so that custom panel on the far right (with Probe, Load 1st Tool, etc.) was already part of my config. If you don't have the tool sensor you can use the tool sensor setup for your machine (it should work fine - as I had mine unplugged on accident for a while) or just compare them to the config files you are using to see how to add the custom bar. To find the different configuration files look in the probotix/linuxcnc/configs directory. Then look for the TS code in the naming convention for your machine --- for example I am using Nebula_4A_TS_2015.
In the custompanel.xml file (for me this was the file probotix/linuxcnc/configs/custompanel.xml) add these lines right after the first 3 lines (just after
<vbox>):<!-- SEG 1-Aug-2015 adding a cycle timer. Also see changes in custom_postgui.hal -->
<hbox>
<label>
<text>"Time"</text>
<font>("Helvetica",14)</font>
</label>
<u32>
<halpin>"time-hours"</halpin>
<font>("Helvetica",14)</font>
<format>"2d"</format>
</u32>
<label>
<text>":"</text>
<font>("Helvetica",14)</font>
</label>
<u32>
<halpin>"time-minutes"</halpin>
<font>("Helvetica",14)</font>
<format>"2d"</format>
</u32>
<label>
<text>":"</text>
<font>("Helvetica",14)</font>
</label>
<u32>
<halpin>"time-seconds"</halpin>
<font>("Helvetica",14)</font>
<format>"2d"</format>
</u32>
</hbox>
<!-- end cycle timer -->Then edit the custom_postgui.hal file (which should be the same directory) and add these lines to the very end of the file:
# SEG 1 August 2015 -- hooking up cycle timer
loadrt time
#loadrt not
addf time.0 servo-thread
addf not.5 servo-thread
net prog-running not.5.in <= halui.program.is-idle
net cycle-timer time.0.start <= not.5.out
net cycle-seconds pyvcp.time-seconds <= time.0.seconds
net cycle-minutes pyvcp.time-minutes <= time.0.minutes
net cycle-hours pyvcp.time-hours <= time.0.hours
After those changes run the .ini file in that same directory which should start up LinuxCNC/Axis with the timer in the upper right corner!
Here are the final files with all of the changes given above: Nebula_4A_TS_2015.zip
References:
http://www.linuxcnc.org/docs/devel/html/man/man9/time.9.html
http://wiki.linuxcnc.org/cgi-bin/wiki.pl?SimpleCycleTimer
http://linuxcnc.org/docs/html/hal/components.html
http://linuxcnc.org/docs/html/hal/pyvcp_examples.html
Saftey - Flying Bit Broke Car Window
13/08/15 16:40
A quick safety notice! I had a 1/8" endmill (1/4" shank) break during a run. When it broke it flew off and hit the back window of my car and shattered it! The bit could have just as easily hit me - so this had me search for the cause and how I could prevent it in the future. The cause was due to a number of issues the main being that a small cutout came loose and got stuck on the bit and when the router plunged back into the workplace the bit was pinched between the extra piece of wood and the workplace and cause the breakage. Ways to help prevent this: (1) use sturdier tabs on cut out items (2) use tabs for the holes within cut outs if they are large (3) along with adding tabs be sure that the table surface is level otherwise the tabs on one end of the workplace may be much thinner than intended. Finally I decided to also add guards around the perimeter of the machine's work space. I used 1/4" to 1/2" MDF (I used the thickest pieces that would fit) and I made them as tall as I could but also allowed the gantry to clear them to prevent a possible collision. Boxing in the workspace also had a side benefit of containing the chips and debris and keeping the leadscrews on the main axis cleaner. Bottom line: be careful and respect the machine.

Router Bit Sources
12/08/15 11:28
Good sources of different kinds of router bits for CNC applications:
Tapered Ball nose: Precise Bits
-- 1/16in (0.0625 in, 1.600 mm) dia. 4-flute 5.4° Tapered Ball-nose Carving bit, 1.00 in. max DOC, 1/4 in. shank, 2.5 in. OAL (overall length)
-- 1/8in (0.1250 in, 3.175 mm) dia. 4-flute 3.6° Tapered Ball-nose Carving bit, 1.00 in. max DOC, 1/4 in. shank, 2.5 in. OAL
-- 1/4in (0.2498 in, 6.345 mm) dia. 4-flute 0° Tapered Ball-nose Carving bit, 1.00 in. max DOC, 1/4 in. shank, 2.5 in. OAL
V-Bits: Precise Bits
-- 30° V-groove cutter, 2 flute, 1/4" shank, solid submicrograin carbide bit, 0.467 in. DOC, 2.5 in. OAL
-- 60° V-groove cutter, 2 flute, 1/4" shank, solid submicrograin carbide bit, 0.217 in. DOC, 2.5 in. OAL
-- 90° V-groove cutter, 2 flute, 1/4" shank, solid submicrograin carbide bit, 0.125 in. DOC, 2.5 in. OAL
and larger V-bits from MLCS (e.g., #7722 1/2 60 deg V-bit)
End Mills: Magnate (may have to call to order some of these part numbers - Tel : 909-468-5008 9AM-5PM pacific)
#9477 1/8" upcut spiral with a 1/4" shank (solid carbide) 2.5 overall length (cut length 0.75") $15
#9497 1/8" downcut spiral with a 1/4" shank (solid carbide) 2.5 overall length (cut length 0.75") $15
#2005 1/4" upcut spiral with a 1/4" shank (solid carbide) 2.5 overall length (cut length 1")
#2105 1/4" downcut spiral with a 1/4" shank (solid carbide) 2.5 overall length (cut length 1")
Other endmill options from Magnate
#9478/#9498 1/8 upcut/downcut 1/4" shank, 0.75" cut length, 2" overall length ~$15
#2001/#2101 1/8 up/down spiral, 1/4" shank, 1/2" cut length, 2" overall length ~$15
#2004/#2104 1/4 upcut/downcut 1/4" shank, 0.75" cut length, 2.5" overall length
#2024/#2124 1/4 upcut/downcut 1/4" shank, 1.25" cut length, 2.5" overall length
1/16 endmill: #5465 MLCS Single Flute Straight
MLCS full carbide end mills (1/8, 1/4, etc.) - upcut and down cut: (good but 1/8 has a shorter cutting length options than Magnate; but free shipping)
MLCS premium carbide end mills
Precise bits has cases too.
T-nuts for Probotix Aluminum Frame
11/08/15 13:35
T-nuts to attach things or modify the frames on the CNC router are from Misumi (part numbers: HNTT5-5 and HNTF6-5).
Useful Accessories
10/08/15 12:49
Dust Shoe from KentCNC. The size that worked best for me was the PC 690/890 for the SharkPro HD - because it has a little further separation (0.5") between the router and the collection outlet which I needed to get around the router mount.
Musclechuck quick change chuck and collet adapters. These make changing bits incredibly easy and fast!
Spray mask material for making signs and helping to paint lettering (VGAP-SPMSK1510N).
CNC Machine Startup Procedure
02/08/15 11:30
This is my startup procedure/checklist:
1. Remove any bits that may be in the router
2. Turn on the Computer (do not power on Probotix control box)
3. When PC is booted up start the LinuxCNC application and load part (.ngc file)
4. Add oil to each axis rails (needed once per day)
5. Turn on the Probotix control box
6. In the Linux CNC application hit the home all button (may want to jog the machine close to home manually beforehand to speed this up)
7. Install router bit and clamp down material as required.
8. Locate (0,0,0) and Touch off for each axis
9. Move the router up (+Z) before running to prevent bit from dragging on material
10. Start up the Dust collection system – until it has stabilized (electrical load purposes)
11. Run the .ngc program.
Saftey Notes
01/08/15 11:16
- DON’T RUN OTHER LARGE TOOLS WHILE CNC MACHINE IS RUNNING (the machine is very susceptible to power fluctuations- unexpected results may occur and can be dangerous)
- Always check Zero and home positions before running a part
- Edge guards are in place (especially if using down-cut bits) - incase a bit breaks and fly's off. Don't want that bit to hit anyone (or break more car glass - oops!)
- Be sure to use a sacrificial board when needed
- Safety glasses!
- Hearing protection!
- Be award of clamps or other things that can come into contact with router and gantry
- Be aware of the current bit's max cutting depth and depth required to cut / clearances
- If cutting out a part be sure part has tall enough tabs for material setup so pieces don’t fly out when cutting.
- when cutting out a deep part – consider using pocket cut to cut out larger than the bit to avoid binding and breaking the bit down in a deep hole
- TABS- be sure to make them big enough and account for cutting deeper than the material!!